ProxyFactory源码分析

初识ProxyFactory

Spring常用工具一文中提到,ProxyFactory可以用来手动生成代理类,以实现对某些对象进行增强。

简单再贴一下ProxyFactory的使用方式:

1
2
3
4
5
6
7
8
9
10
11
12
13
14
15
16
17
18
public class Bean {
public String hello() {
return "hello";
}

public static void main(String[] args) {
ProxyFactory proxyFactory = new ProxyFactory();
proxyFactory.setTarget(new Bean());
proxyFactory.addAdvice((MethodInterceptor) invocation -> {
if (!"hello".equals(invocation.getMethod().getName())) {
return invocation.proceed();
}
return "elin, " + invocation.proceed() + "!";
});
Object proxy = proxyFactory.getProxy();
System.out.println(((Bean) proxy).hello());
}
}

当需要生成一些对象的代理类进行增强需求时,用这个工具比自己手动使用动态代理等方式创建代理类方便许多。

其实,ProxyFactory也是Spring AOP的实现方式,本文将解析一下ProxyFactory的实现方式。

上文提到的ProxyFactory例子中,先创建了一个ProxyFactory实例,然后设置了一些参数,最后调用ProxyFactory#getProxy方法创建了一个对象,这个对象就是增强后的代理对象,调用增强后的实例的hello方法,可以发现输出内容已经被增强。

为了了解其实现原理,可以直接看第15行的getProxy方法的源码。

1
2
3
public Object getProxy() {
return createAopProxy().getProxy();
}

该方法的源码很简单,分为两个部分,分别是createAopProxygetProxy。从方法名可以看出,createAopProxy应该是用来创建一个AopProxygetProxy是获取代理对象。

AopProxy

我们先看一下createAopProxy方法返回的AopProxy是个什么:

1
2
3
4
5
6
7
public interface AopProxy {

Object getProxy();

Object getProxy(@Nullable ClassLoader classLoader);

}

AopProxy是一个接口,只有两个方法,分别是getProxy和需要ClassLoader入参的getProxy。通过方法名就可以猜到,这两个方法都是用来获取代理类,一个是不需要指定ClassLoader,另一个可以指定ClassLoader,说明这两个方法的本质是一样的。

再看一下这个类的注释

Delegate interface for a configured AOP proxy, allowing for the creation of actual proxy objects.
Out-of-the-box implementations are available for JDK dynamic proxies and for CGLIB proxies, as applied by DefaultAopProxyFactory.

通过注释和定义的方法,可以大致了解到,这个接口的实现类是用来创建代理对象的,而其实现类可以通过JDK动态代理或CGLIB来创建代理。具体的代码可以在DefaultAopProxyFactory中看到。

AopProxy有大致了解以后,再回到之前的代码中,看一下createAopProxy方法的代码,可以发现createAopProxy是在ProxyFactory的父类ProxyCreatorSupport中定义的。

1
2
3
4
5
6
7
protected final synchronized AopProxy createAopProxy() {
if (!this.active) {
// 第一次调用此方法时,将其状态设置为开启,并初始化listener,listener可以用来监听一些时间,此处不涉及
activate();
}
return getAopProxyFactory().createAopProxy(this);
}

这个方法中主要看第六行,也分为两个部分,分别是getAopProxyFactorycreateAopProxy。还是通过方法名先猜一下这两个方法的含义,getAopProxyFactory是获取一个AopProxy工厂,createAopProxy是通过工厂创建AopProxy实例。这样的逻辑也符合当前方法需要创建AopProxy的目的。

通过看其实现代码来验证一下猜测,先看一下getAopProxyFactory的实现:

1
2
3
public AopProxyFactory getAopProxyFactory() {
return this.aopProxyFactory;
}

发现这个方法直接返回了当前实例持有的AopProxyFactory对象,那么这个对象在哪里创建的呢?就在当前类的构造方法中

1
2
3
public ProxyCreatorSupport() {
this.aopProxyFactory = new DefaultAopProxyFactory();
}

发现在构造方法中,创建了一个DefaultAopProxyFactory对象,这个类在上文将AopProxy的时候提到过,也可以发现,该类是AopProxyFactory接口的唯一实现。

那么直接看一下DefaultAopProxyFactory#createAopProxy的代码:

1
2
3
4
5
6
7
8
9
10
11
12
13
14
15
16
17
18
19
public AopProxy createAopProxy(AdvisedSupport config) throws AopConfigException {
// 判断当前需要增强的对象是否需要优化;是否需要直接代理目标类;是否需要实现接口
if (config.isOptimize() || config.isProxyTargetClass() || hasNoUserSuppliedProxyInterfaces(config)) {
Class<?> targetClass = config.getTargetClass();
if (targetClass == null) {
throw new AopConfigException("TargetSource cannot determine target class: " +
"Either an interface or a target is required for proxy creation.");
}
if (targetClass.isInterface() || Proxy.isProxyClass(targetClass)) {
// 如果目标类型是接口或已经是代理类型,使用JDK动态代理
return new JdkDynamicAopProxy(config);
}
// 否则使用CGLIB
return new ObjenesisCglibAopProxy(config);
}
else {
return new JdkDynamicAopProxy(config);
}
}

可以发现,这段代码是判断需要通过什么方式来创建代理对象,在这里需要对JDK动态代理和CGLIB有一定的了解,例如动态代理要求必须有接口才可以进行代理,是通过实现父接口的方式创建代理的;CGLIB是通过生成目标类型的子类进行代理的,那么这个目标类型必须不能是final的(final类不能继承),而且已经CGLIB代理过一次的类型不能再次进行代理(因为CGLIB在代理时会生成一些特殊的方法,如果重复代理会导致方法冲突)。

有了这些简单了解后,便可以理解为什么此处要根据代理类型进行区分处理了。

到此为止,我们已经分析完了ProxyCreatorSupport#createAopProxy方法,已经得到了适合当前目标类型的AopProxy。接下来便是分析AopProxy#getProxy,由于AopProxy有两个实现类,分别是JdkDynamicAopProxyObjenesisCglibAopProxy,我们分别看一下这两个类的getProxy代码。

JdkDynamicAopProxy

JdkDynamicAopProxy的getProxy方法比较简单,调用了同名的重载方法,传入了当前的默认ClassLoader

1
2
3
public Object getProxy() {
return getProxy(ClassUtils.getDefaultClassLoader());
}

再看一下带参的getProxy方法:

1
2
3
4
5
6
7
8
9
10
11
public Object getProxy(@Nullable ClassLoader classLoader) {
if (logger.isTraceEnabled()) {
logger.trace("Creating JDK dynamic proxy: " + this.advised.getTargetSource());
}
// 这个方法用来获取代理对象具体要实现的接口,不细讲了,感兴趣可以跟进去看一下
Class<?>[] proxiedInterfaces = AopProxyUtils.completeProxiedInterfaces(this.advised, true);
// 寻找增强的逻辑中是否对Object类中定义的equals和hashCode方法进行增强,比较简单不细讲了,可以自己看下
findDefinedEqualsAndHashCodeMethods(proxiedInterfaces);
// 创建代理
return Proxy.newProxyInstance(classLoader, proxiedInterfaces, this);
}

这里主要做了三件事,实现的功能从上文代码中的注释可以了解到,前两个方法都比较简单,读者只要了解其作用,感兴趣可以进去看一下实现。

着重看一下第十行,使用过动态代理的读者应该比较熟悉这行代码,传入的参数分别是ClassLoader、代理类需要实现的接口数组、InvocationHandler对象。

其中前两个参数比较简单,第三个参数InvocationHandler需要大家自行学习一下动态代理的相关知识,大致的作用就是当代理对象的方法被调用时,将会回调InvocationHandler实现对象的invoke方法,而这个方法就是使用动态代理方式进行增强的核心。

可以看到,这里需要传入InvocationHandler对象地方传入了this,原来当前类JdkDynamicAopProxy也实现了InvocationHandler接口,那么看一下当前类的invoke方法。

1
2
3
4
5
6
7
8
9
10
11
12
13
14
15
16
17
18
19
20
21
22
23
24
25
26
27
28
29
30
31
32
33
34
35
36
37
38
39
40
41
42
43
44
45
46
47
48
49
50
51
52
53
54
55
56
57
58
59
60
61
62
63
64
65
66
67
68
69
70
71
72
73
74
75
76
77
78
79
80
81
82
83
84
85
86
// 需要读者补充一下基础支持,该方法被回调时传入的三个参数分别是:被调用的代理对象、被调用的方法、调用参数列表
public Object invoke(Object proxy, Method method, Object[] args) throws Throwable {
MethodInvocation invocation;
Object oldProxy = null;
boolean setProxyContext = false;

TargetSource targetSource = this.advised.targetSource;
Object target = null;

try {
if (!this.equalsDefined && AopUtils.isEqualsMethod(method)) {
// 没有增强equals方法并且当前equals方法被调用时,略过读者自行了解
return equals(args[0]);
}
else if (!this.hashCodeDefined && AopUtils.isHashCodeMethod(method)) {
// 没有增强hashCode方法并且当前hashCode方法被调用时,略过读者自行了解
return hashCode();
}
else if (method.getDeclaringClass() == DecoratingProxy.class) {
// DecoratingProxy中定义的方法单独处理,略过
return AopProxyUtils.ultimateTargetClass(this.advised);
}
else if (!this.advised.opaque && method.getDeclaringClass().isInterface() &&
method.getDeclaringClass().isAssignableFrom(Advised.class)) {
// Advised中定义的方法单独处理,略过
return AopUtils.invokeJoinpointUsingReflection(this.advised, method, args);
}

Object retVal;

if (this.advised.exposeProxy) {
// Make invocation available if necessary.
oldProxy = AopContext.setCurrentProxy(proxy);
setProxyContext = true;
}

// Get as late as possible to minimize the time we "own" the target,
// in case it comes from a pool.
target = targetSource.getTarget();
Class<?> targetClass = (target != null ? target.getClass() : null);

// 获取当前方法的拦截器链,即一些增强当前方法的一些逻辑,在AOP中称为通知(advice),后面会单独讲
List<Object> chain = this.advised.getInterceptorsAndDynamicInterceptionAdvice(method, targetClass);

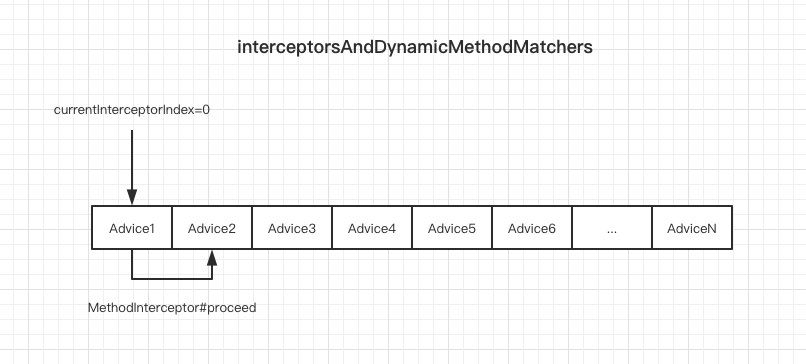
// 判断是否有需要执行的通知(advice),即上面获得的拦截器链,如果为空,就直接执行目标对象的方法
// 不需要走增强逻辑了
if (chain.isEmpty()) {
// We can skip creating a MethodInvocation: just invoke the target directly
// Note that the final invoker must be an InvokerInterceptor so we know it does
// nothing but a reflective operation on the target, and no hot swapping or fancy proxying.
// 在一些特殊情况下转换一下请求参数,不清楚什么情况下会使用,知道的读者可以告诉我
Object[] argsToUse = AopProxyUtils.adaptArgumentsIfNecessary(method, args);
// 通过反射的方式调用目标对象的对应方法
retVal = AopUtils.invokeJoinpointUsingReflection(target, method, argsToUse);
}
else {
// 需要执行拦截器链的情况下,创建一个ReflectiveMethodInvocation并执行,后面细讲
invocation = new ReflectiveMethodInvocation(proxy, target, method, args, targetClass, chain);
retVal = invocation.proceed();
}

// 给返回值做一下马杀鸡(原文就是这么说的-_-||),即处理一下返回值
Class<?> returnType = method.getReturnType();
if (retVal != null && retVal == target &&
returnType != Object.class && returnType.isInstance(proxy) &&
!RawTargetAccess.class.isAssignableFrom(method.getDeclaringClass())) {
// 一些特殊情况下,原方法会返回this,即目标对象,那么这里应该返回代理对象,而不是原对象,所以返回值修改为当前代理对象
retVal = proxy;
}
else if (retVal == null && returnType != Void.TYPE && returnType.isPrimitive()) {
throw new AopInvocationException(
"Null return value from advice does not match primitive return type for: " + method);
}
return retVal;
}
finally {
if (target != null && !targetSource.isStatic()) {
// Must have come from TargetSource.
targetSource.releaseTarget(target);
}
if (setProxyContext) {
// Restore old proxy.
AopContext.setCurrentProxy(oldProxy);
}
}
}

这个方法是到本文到目前为止见过的最复杂的代码了,读者先根据上面贴的代码及注释简单了解一下,整体流程还是比较简单的,这里流程就不具体讲了。

需要展开将两个方法,分别是43行AdvisedSupport#getInterceptorsAndDynamicInterceptionAdvice和59行ReflectiveMethodInvocation#proceed

AdvisedSupport#getInterceptorsAndDynamicInterceptionAdvice

先贴上AdvisedSupport#getInterceptorsAndDynamicInterceptionAdvice的代码:

1
2
3
4
5
6
7
8
9
10
public List<Object> getInterceptorsAndDynamicInterceptionAdvice(Method method, @Nullable Class<?> targetClass) {
MethodCacheKey cacheKey = new MethodCacheKey(method);
List<Object> cached = this.methodCache.get(cacheKey);
if (cached == null) {
cached = this.advisorChainFactory.getInterceptorsAndDynamicInterceptionAdvice(
this, method, targetClass);
this.methodCache.put(cacheKey, cached);
}
return cached;
}

这个方法中是对拦截器链进行了缓存处理,如果缓存存在则直接返回,如果不存在执行第5行的AdvisorChainFactory#getInterceptorsAndDynamicInterceptionAdvice,说明解析拦截器的过程是委托给AdvisorChainFactory处理的,而实际的执行类是其实现类DefaultAdvisorChainFactory,那么进入DefaultAdvisorChainFactory的代码。

1
2
3
4
5
6
7
8
9
10
11
12
13
14
15
16
17
18
19
20
21
22
23
24
25
26
27
28
29
30
31
32
33
34
35
36
37
38
39
40
41
42
43
44
45
46
47
48
49
50
51
52
53
54
55
56
57
58
59
60
61
62
public List<Object> getInterceptorsAndDynamicInterceptionAdvice(
Advised config, Method method, @Nullable Class<?> targetClass) {

// This is somewhat tricky... We have to process introductions first,
// but we need to preserve order in the ultimate list.
// GlobalAdvisorAdapterRegistry.getInstance() 方法返回的是一个单例
// 即DefaultAdvisorAdapterRegistry实例
AdvisorAdapterRegistry registry = GlobalAdvisorAdapterRegistry.getInstance();
Advisor[] advisors = config.getAdvisors();
List<Object> interceptorList = new ArrayList<>(advisors.length);
Class<?> actualClass = (targetClass != null ? targetClass : method.getDeclaringClass());
Boolean hasIntroductions = null;

// 遍历所有的通知
for (Advisor advisor : advisors) {
if (advisor instanceof PointcutAdvisor) {
// 这里不细讲了,简单来说就是需要判断该方法是否被当前通知处理
PointcutAdvisor pointcutAdvisor = (PointcutAdvisor) advisor;
if (config.isPreFiltered() || pointcutAdvisor.getPointcut().getClassFilter().matches(actualClass)) {
MethodMatcher mm = pointcutAdvisor.getPointcut().getMethodMatcher();
boolean match;
if (mm instanceof IntroductionAwareMethodMatcher) {
if (hasIntroductions == null) {
hasIntroductions = hasMatchingIntroductions(advisors, actualClass);
}
match = ((IntroductionAwareMethodMatcher) mm).matches(method, actualClass, hasIntroductions);
}
else {
match = mm.matches(method, actualClass);
}
if (match) {
// 如果匹配上了,调用DefaultAdvisorAdapterRegistry#getInterceptors进行包装
// 后面会细讲这个方法
MethodInterceptor[] interceptors = registry.getInterceptors(advisor);
if (mm.isRuntime()) {
// Creating a new object instance in the getInterceptors() method
// isn't a problem as we normally cache created chains.
for (MethodInterceptor interceptor : interceptors) {
interceptorList.add(new InterceptorAndDynamicMethodMatcher(interceptor, mm));
}
}
else {
interceptorList.addAll(Arrays.asList(interceptors));
}
}
}
}
else if (advisor instanceof IntroductionAdvisor) {
IntroductionAdvisor ia = (IntroductionAdvisor) advisor;
if (config.isPreFiltered() || ia.getClassFilter().matches(actualClass)) {
Interceptor[] interceptors = registry.getInterceptors(advisor);
interceptorList.addAll(Arrays.asList(interceptors));
}
}
else {
Interceptor[] interceptors = registry.getInterceptors(advisor);
interceptorList.addAll(Arrays.asList(interceptors));
}
}

return interceptorList;
}

这个方法又是个大家伙,这个方法里有一些不影响整体流程的细节这里都略过,核心点是需要把匹配上的通知对象包装成Interceptor对象,多个Interceptor组成一个拦截器链。上面代码中三个不同分支都调用了AdvisorAdapterRegistry#getInterceptors,分别是34行、51行、56行,下面着重讲一下这个方法。

在看具体代码之前,先看一下AdvisorAdapterRegistry是用来干什么的,文档中对其的描述只有一句话

Interface for registries of Advisor adapters.

大致我们可以猜到,这是一个进行适配的工具,这里读者可以自行回顾一下适配器这个设计模式。

那么在这里,既然需要适配,我们需要了解将什么适配成什么。其实能猜到,这个方法的入参是Advisor,而返回值是Interceptor,那么大概率就是这两个类型之间进行适配了。

有了前面对这个方法的大致猜测,可以进入代码验证我们的猜想

1
2
3
4
5
6
7
8
9
10
11
12
13
14
15
16
17
18
public MethodInterceptor[] getInterceptors(Advisor advisor) throws UnknownAdviceTypeException {
List<MethodInterceptor> interceptors = new ArrayList<>(3);
Advice advice = advisor.getAdvice();
if (advice instanceof MethodInterceptor) {
// 如果是MethodInterceptor对象,直接可以使用
interceptors.add((MethodInterceptor) advice);
}
// 这里遍历了所有的适配器,如果有支持当前通知的适配器,就进行适配
for (AdvisorAdapter adapter : this.adapters) {
if (adapter.supportsAdvice(advice)) {
interceptors.add(adapter.getInterceptor(advisor));
}
}
if (interceptors.isEmpty()) {
throw new UnknownAdviceTypeException(advisor.getAdvice());
}
return interceptors.toArray(new MethodInterceptor[0]);
}

在之前的例子中,因为使用的通知都是MethodInterceptor类型,所以可以直接使用。

后面循环遍历适配器的逻辑,其实是用在Spring AOP功能中的,在这里也分析一下。

先看下遍历的适配器AdvisorAdapter

1
2
3
4
5
6
7
public interface AdvisorAdapter {

boolean supportsAdvice(Advice advice);

MethodInterceptor getInterceptor(Advisor advisor);

}

AdvisorAdapter有两个方法,supportsAdvice用来返回是否支持当前AdvicegetInterceptor用来将支持的Advice适配成MethodInterceptor

看一下AdvisorAdapter接口的实现类只有三个,分别是MethodBeforeAdviceAdapterAfterReturningAdviceAdapterThrowsAdviceAdapter,熟悉AOP的读者是不是觉得很熟悉?这三种适配器分别对应了三种AdviceMethodBeforeAdviceAfterReturningAdviceThrowsAdviceAdapter,这三种适配器真是用来除了这三种Advice,将其包装成MethodBeforeAdviceInterceptorAfterReturningAdviceAdapterThrowsAdviceInterceptor

这三个类均继承了Interceptor接口,实现了其invoke方法。请读者自行进入这三个方法中阅读以下源码,因为很简单此处不多说了,但阅读完后能对三种通知有更深的理解,建议阅读。

ReflectiveMethodInvocation#proceed

先贴上ReflectiveMethodInvocation#proceed的代码:

1
2
3
4
5
6
7
8
9
10
11
12
13
14
15
16
17
18
19
20
21
22
23
24
25
26
27
28
29
public Object proceed() throws Throwable {
// currentInterceptorIndex是该对象的变量,初始值为-1,后面会进行自增
if (this.currentInterceptorIndex == this.interceptorsAndDynamicMethodMatchers.size() - 1) {
// 如果index=size-1 说明数组遍历完了,那直接执行目标对象的原始方法
return invokeJoinpoint();
}
// 从数组中取出一个对象,其类型是InterceptorAndDynamicMethodMatcher 或 MethodInterceptor
Object interceptorOrInterceptionAdvice =
this.interceptorsAndDynamicMethodMatchers.get(++this.currentInterceptorIndex);
if (interceptorOrInterceptionAdvice instanceof InterceptorAndDynamicMethodMatcher) {

InterceptorAndDynamicMethodMatcher dm =
(InterceptorAndDynamicMethodMatcher) interceptorOrInterceptionAdvice;
Class<?> targetClass = (this.targetClass != null ? this.targetClass : this.method.getDeclaringClass());
// InterceptorAndDynamicMethodMatcher对象需要进行匹配,判断当前是否需要执行
if (dm.methodMatcher.matches(this.method, targetClass, this.arguments)) {
// 匹配成功的情况,取出对象持有的MethodInterceptor 进行调用
return dm.interceptor.invoke(this);
}
else {
// 匹配失败的情况,递归调用,执行下一个节点
return proceed();
}
}
else {
// 普通MethodInterceptor,直接执行
return ((MethodInterceptor) interceptorOrInterceptionAdvice).invoke(this);
}
}

这块代码设计比较巧妙,主要从两个方面来看。

  1. ReflectiveMethodInvocation维护了一个currentInterceptorIndex成员变量,这个变量的初始值是-1,每次调用proceed方法时自增,而这个索引是表示当前已经执行的拦截链的序号,通过递归调用proceed可以实现执行下一个拦截器。当currentInterceptorIndex等于当前拦截链的长度,即所有的拦截器都执行完了,则执行目标对象原始的方法。
  2. 注意当前类ReflectiveMethodInvocation实现了ProxyMethodInvocation接口,而ProxyMethodInvocation接口又继承了MethodInterceptor,并实现了proceed方法,再回头看最开始的的那个例子中,Advice接口的回调方法入参正好是MethodInterceptor,所以在Advice的回调方法中如果调用了MethodInterceptor#proceed,相当于执行下一个拦截器。

image-20200424104205467

总结一下,就是interceptorsAndDynamicMethodMatchers(简称拦截链)中的一个节点,可以通过两种方式执行下一个节点:递归调用proceed、通过Advice实现类中调用入参的proceed

ObjenesisCglibAopProxy

分析完了JdkDynamicAopProxy后,阅读ObjenesisCglibAopProxy的源码会简单很多,因为ObjenesisCglibAopProxy中的部分核心代码与JdkDynamicAopProxy基本一致,先卖个关子,后面会细说。

CGLib与Callback

在具体阅读源码前,需要一个简单的储备知识,通过CGLib方式生成代理时,有两种方式进行增强。

设置Callback

在设置代理对象时,通过传入Callback,当需要执行代理对象的所有方法时,将会回调传入的Callback对象,一般使用Callback的子接口org.springframework.cglib.proxy.MethodInterceptor,实现其intercept方法,可以拦截目标方法进行增强。

这种方式创建代理,与JDK 动态代理的生成很类似,读者可以对比着看。

设置Callback[] 与CallbackFilter

CGLib提供了一种更为灵活的增强方式,可以传入一组CallBack对象,再传入一个CallbackFilter即过滤器,可以动态选择使用哪一个Callback

CallbackFilter接口中的accept方法用来实现过滤逻辑,在每次代理方法被调用时,先调用accept方法,accept方法返回一个int结果,即决定选用Callback数组中的哪一个Callback

一个简单的例子:

1
2
3
4
5
6
7
8
9
10
11
12
13
14
15
16
17
18
19
20
21
22
23
24
25
26
27
28
29
30
31
32
33
34
public class Bean {
public String hello1() {
return "hello1";
}

public String hello2() {
return "hello2";
}

public static void main(String[] args) {
Bean bean = new Bean();
Enhancer enhancer = new Enhancer();
enhancer.setSuperclass(Bean.class);
enhancer.setCallbacks(new Callback[]{
(MethodInterceptor) (o, method, objects, methodProxy) -> "callback 1 invoke:" + method.invoke(bean, objects),
//这个CallBack表示不进行增强,执行原始方法
(MethodInterceptor) (o, method, objects, methodProxy) -> method.invoke(bean, objects),
});
enhancer.setCallbackTypes(new Class[]{MethodInterceptor.class, MethodInterceptor.class,
MethodInterceptor.class});
enhancer.setCallbackFilter(method -> {
if ("hello1".equals(method.getName())) {
return 0;
} else if ("hello2".equals(method.getName())) {
return 1;
}
return 2;
});
Object proxy = enhancer.create();
System.out.println(((Bean) proxy).hello1());
System.out.println(((Bean) proxy).hello2());
}
}

CglibAopProxy#getProxy

补充完基础知识后,我们回到正题,进入我们要分析的ObjenesisCglibAopProxy类,前面我们提到ProxyCreatorSupport会调用目标AopProxygetProxy方法,ObjenesisCglibAopProxygetProxy在其父类CglibAopProxy中实现。

1
2
3
4
5
6
7
8
9
10
11
12
13
14
15
16
17
18
19
20
21
22
23
24
25
26
27
28
29
30
31
32
33
34
35
36
37
38
39
40
41
42
43
44
45
46
47
48
49
50
51
52
53
54
55
56
57
58
public Object getProxy(@Nullable ClassLoader classLoader) {
if (logger.isTraceEnabled()) {
logger.trace("Creating CGLIB proxy: " + this.advised.getTargetSource());
}

try {
Class<?> rootClass = this.advised.getTargetClass();
Assert.state(rootClass != null, "Target class must be available for creating a CGLIB proxy");

Class<?> proxySuperClass = rootClass;
if (ClassUtils.isCglibProxyClass(rootClass)) {
proxySuperClass = rootClass.getSuperclass();
Class<?>[] additionalInterfaces = rootClass.getInterfaces();
for (Class<?> additionalInterface : additionalInterfaces) {
this.advised.addInterface(additionalInterface);
}
}

// Validate the class, writing log messages as necessary.
validateClassIfNecessary(proxySuperClass, classLoader);

// Configure CGLIB Enhancer...
Enhancer enhancer = createEnhancer();
if (classLoader != null) {
enhancer.setClassLoader(classLoader);
if (classLoader instanceof SmartClassLoader &&
((SmartClassLoader) classLoader).isClassReloadable(proxySuperClass)) {
enhancer.setUseCache(false);
}
}
enhancer.setSuperclass(proxySuperClass);
enhancer.setInterfaces(AopProxyUtils.completeProxiedInterfaces(this.advised));
enhancer.setNamingPolicy(SpringNamingPolicy.INSTANCE);
enhancer.setStrategy(new ClassLoaderAwareUndeclaredThrowableStrategy(classLoader));

Callback[] callbacks = getCallbacks(rootClass);
Class<?>[] types = new Class<?>[callbacks.length];
for (int x = 0; x < types.length; x++) {
types[x] = callbacks[x].getClass();
}
// fixedInterceptorMap only populated at this point, after getCallbacks call above
enhancer.setCallbackFilter(new ProxyCallbackFilter(
this.advised.getConfigurationOnlyCopy(), this.fixedInterceptorMap, this.fixedInterceptorOffset));
enhancer.setCallbackTypes(types);

// Generate the proxy class and create a proxy instance.
return createProxyClassAndInstance(enhancer, callbacks);
}
catch (CodeGenerationException | IllegalArgumentException ex) {
throw new AopConfigException("Could not generate CGLIB subclass of " + this.advised.getTargetClass() +
": Common causes of this problem include using a final class or a non-visible class",
ex);
}
catch (Throwable ex) {
// TargetSource.getTarget() failed
throw new AopConfigException("Unexpected AOP exception", ex);
}
}

这个方法的篇幅比较长,我们不仔细介绍了,只关注其中的关键点。

在[设置Callback[] 与CallbackFilter](#设置Callback[] 与CallbackFilter)一节中提到,我们创建代理对象需要CallBack数组和CallbackFilter,在上面的源码中,分别在第36行和第42行获取了这两个对象,我们着重分析一下这两个对象。

Callback列表

getCallbacks方法中,我们关注这一段代码,在一般情况下,我们的Callback列表就是这样创建的

1
2
3
4
5
6
7
8
9
Callback[] mainCallbacks = new Callback[] {
aopInterceptor, // AOP拦截器,实现AOP增强的关键对象
targetInterceptor, // 直接调用目标方法,相当于不增强,略过
new SerializableNoOp(), // 什么也不执行,略过
targetDispatcher,
this.advisedDispatcher,
new EqualsInterceptor(this.advised),
new HashCodeInterceptor(this.advised)
};

这里我们只关心aopInterceptor对象,即DynamicAdvisedInterceptor类:

1
2
3
4
5
6
7
8
9
10
11
12
13
14
15
16
17
18
19
20
21
22
23
24
25
26
27
28
29
30
31
32
33
34
35
36
37
38
39
40
41
42
43
public Object intercept(Object proxy, Method method, Object[] args, MethodProxy methodProxy) throws Throwable {
Object oldProxy = null;
boolean setProxyContext = false;
Object target = null;
TargetSource targetSource = this.advised.getTargetSource();
try {
if (this.advised.exposeProxy) {
// Make invocation available if necessary.
oldProxy = AopContext.setCurrentProxy(proxy);
setProxyContext = true;
}
// Get as late as possible to minimize the time we "own" the target, in case it comes from a pool...
target = targetSource.getTarget();
Class<?> targetClass = (target != null ? target.getClass() : null);
List<Object> chain = this.advised.getInterceptorsAndDynamicInterceptionAdvice(method, targetClass);
Object retVal;
// Check whether we only have one InvokerInterceptor: that is,
// no real advice, but just reflective invocation of the target.
if (chain.isEmpty() && Modifier.isPublic(method.getModifiers())) {
// We can skip creating a MethodInvocation: just invoke the target directly.
// Note that the final invoker must be an InvokerInterceptor, so we know
// it does nothing but a reflective operation on the target, and no hot
// swapping or fancy proxying.
Object[] argsToUse = AopProxyUtils.adaptArgumentsIfNecessary(method, args);
retVal = methodProxy.invoke(target, argsToUse);
}
else {
// We need to create a method invocation...
retVal = new CglibMethodInvocation(proxy, target, method, args, targetClass, chain, methodProxy).proceed();
}
retVal = processReturnType(proxy, target, method, retVal);
return retVal;
}
finally {
if (target != null && !targetSource.isStatic()) {
targetSource.releaseTarget(target);
}
if (setProxyContext) {
// Restore old proxy.
AopContext.setCurrentProxy(oldProxy);
}
}
}

是不是非常眼熟?这就是前面提到过的,通过CGLib进行增强时,核心代码与JDK 动态代理是非常类似的,自行看第15行,即我们之前分析过的AdvisedSupport#getInterceptorsAndDynamicInterceptionAdvice;而第29行的CglibMethodInvocation,就是我们之前提到过的ReflectiveMethodInvocation类的子类,其执行逻辑几乎是一致的,在这里就不重复讲了。

ProxyCallbackFilter

最后,我们再看一下CGLib是怎么选用Callback的,直接看ProxyCallbackFilter的源码:

1
2
3
4
5
6
7
8
9
10
11
12
13
14
15
16
17
18
19
20
21
22
23
24
25
26
27
28
29
30
31
32
33
34
35
36
37
38
39
40
41
42
43
44
45
46
47
48
49
50
51
52
53
54
55
56
57
58
59
60
61
62
63
64
65
66
67
68
69
70
71
72
73
74
75
76
77
78
79
80
81
82
83
84
85
public int accept(Method method) {
if (AopUtils.isFinalizeMethod(method)) {
logger.trace("Found finalize() method - using NO_OVERRIDE");
return NO_OVERRIDE;
}
if (!this.advised.isOpaque() && method.getDeclaringClass().isInterface() &&
method.getDeclaringClass().isAssignableFrom(Advised.class)) {
if (logger.isTraceEnabled()) {
logger.trace("Method is declared on Advised interface: " + method);
}
return DISPATCH_ADVISED;
}
// We must always proxy equals, to direct calls to this.
if (AopUtils.isEqualsMethod(method)) {
if (logger.isTraceEnabled()) {
logger.trace("Found 'equals' method: " + method);
}
return INVOKE_EQUALS;
}
// We must always calculate hashCode based on the proxy.
if (AopUtils.isHashCodeMethod(method)) {
if (logger.isTraceEnabled()) {
logger.trace("Found 'hashCode' method: " + method);
}
return INVOKE_HASHCODE;
}
Class<?> targetClass = this.advised.getTargetClass();
// Proxy is not yet available, but that shouldn't matter.
List<?> chain = this.advised.getInterceptorsAndDynamicInterceptionAdvice(method, targetClass);
boolean haveAdvice = !chain.isEmpty();
boolean exposeProxy = this.advised.isExposeProxy();
boolean isStatic = this.advised.getTargetSource().isStatic();
boolean isFrozen = this.advised.isFrozen();
if (haveAdvice || !isFrozen) {
// If exposing the proxy, then AOP_PROXY must be used.
if (exposeProxy) {
if (logger.isTraceEnabled()) {
logger.trace("Must expose proxy on advised method: " + method);
}
return AOP_PROXY;
}
String key = method.toString();
// Check to see if we have fixed interceptor to serve this method.
// Else use the AOP_PROXY.
if (isStatic && isFrozen && this.fixedInterceptorMap.containsKey(key)) {
if (logger.isTraceEnabled()) {
logger.trace("Method has advice and optimizations are enabled: " + method);
}
// We know that we are optimizing so we can use the FixedStaticChainInterceptors.
int index = this.fixedInterceptorMap.get(key);
return (index + this.fixedInterceptorOffset);
}
else {
if (logger.isTraceEnabled()) {
logger.trace("Unable to apply any optimizations to advised method: " + method);
}
return AOP_PROXY;
}
}
else {
// See if the return type of the method is outside the class hierarchy of the target type.
// If so we know it never needs to have return type massage and can use a dispatcher.
// If the proxy is being exposed, then must use the interceptor the correct one is already
// configured. If the target is not static, then we cannot use a dispatcher because the
// target needs to be explicitly released after the invocation.
if (exposeProxy || !isStatic) {
return INVOKE_TARGET;
}
Class<?> returnType = method.getReturnType();
if (targetClass != null && returnType.isAssignableFrom(targetClass)) {
if (logger.isTraceEnabled()) {
logger.trace("Method return type is assignable from target type and " +
"may therefore return 'this' - using INVOKE_TARGET: " + method);
}
return INVOKE_TARGET;
}
else {
if (logger.isTraceEnabled()) {
logger.trace("Method return type ensures 'this' cannot be returned - " +
"using DISPATCH_TARGET: " + method);
}
return DISPATCH_TARGET;
}
}
}

第29行获取拦截链的方法,也是之前分析过的,在不为空的情况下,将会进入39行~59行这个代码块中,在这里一般情况下都会返回AOP_PROXY这个常量,即0。前面我们提过,accept方法返回的是当前代理方法需要执行的Callback序号,第0位即前面分析过的DynamicAdvisedInterceptor对象。

后记

至此,ProxyFactory的所有代码都分析完了。一些细节分支没有深入讨论,因为大多不影响主要流程,感兴趣的读者可以自行阅读。

在日常工作中,阅读源码并没有很大的作用,但是通过优秀源码的学习,可以理解大牛写代码的技巧与方法,争取早日向大牛靠拢。

如果这篇文章对你有帮助,可以请作者喝杯咖啡~